Why Does a Sump Pump Check Valve Fail?

A sump pump check valve rarely fails without warning. Water may surge backward, the pump may cycle repeatedly, or a sharp bang may echo through the discharge pipe. These symptoms seem minor, but they can expose a serious drainage weakness.

The Insurance Information Institute reports that water damage and freezing represented about 24% of homeowners insurance claims from 2018 to 2022. FEMA also warns that one inch of indoor water can cause roughly $25,000 in damage. Those figures explain why a small valve deserves careful attention. A failed sump pump check valve can send discharged water back into the pit, increasing motor wear and raising the risk of basement flooding.

John Zoeller, a former Zoeller Pump Company president, described the valve’s purpose plainly: “A check valve prevents water from flowing back into the sump pit.” That simple sentence matters. The valve must handle pressure, debris, vibration, and repeated cycling. In real basements, muddy water and a poorly supported discharge line can shorten its life. Installation details are often overlooked.

This guide examines why a sump pump check valve fails, including worn seals, incorrect sizing, trapped debris, freezing, and water hammer. It also considers warning signs that homeowners can observe before failure becomes expensive. Some diagnoses remain uncertain without inspecting the valve directly. That is worth admitting. A noisy pump does not always mean the valve is defective, and replacing parts blindly can waste money. Reliable troubleshooting starts with the pipe layout, pump cycle, valve direction, and actual flow behavior.
Why Does a Sump Pump Check Valve Fail?

What a Sump Pump Check Valve Does

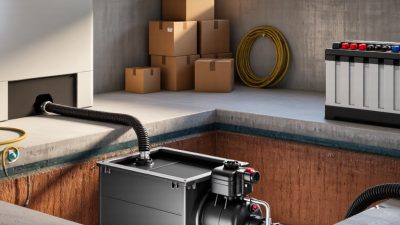
A sump pump check valve is a one-way gate in the discharge pipe. It lets pumped water leave the pit, then blocks that water from returning. Without it, gravity can send water back into the basin after each shutdown. The pump may restart repeatedly. That wastes electricity and increases motor wear.

It is a small gate. Its failure usually starts quietly. Sediment can prevent the flap from sealing. Rust, mineral buildup, a cracked hinge, or incorrect installation can also cause leakage. A loose pipe may create vibration and water hammer. In cold spaces, freezing can split the valve or discharge line. The Insurance Information Institute reported that water damage and freezing represented about 29% of homeowners insurance claims from 2017 to 2021, with an average claim of $12,514. That figure does not isolate sump failures, but it shows the financial importance of controlling water movement.

During inspection, I listen for repeated cycling after the pump stops. I also check whether water visibly falls back into the pit. A properly fitted valve should match the pipe diameter and remain accessible for cleaning. Some installations place the valve too close to the pump, leaving little room for service. That is easy to overlook. Replacing the part may solve the symptom, but poor discharge routing can cause another failure. A careful technician checks pipe support, slope, debris, and backup drainage conditions before declaring the system reliable.

Common Causes of Sump Pump Check Valve Failure

Why Does a Sump Pump Check Valve Fail?

A sump pump check valve usually fails because water, debris, or installation errors weaken its seal. A reversed valve can block discharge flow and force the pump to work harder. A loose connection may also allow water to drain back into the pit after each cycle. That repeated backflow can create short cycling, especially during heavy rain.

Debris is another common cause. Small stones, iron flakes, or plastic fragments can lodge inside the valve. The hinge may then remain partly open. In cold regions, trapped water can freeze and split the valve body. Service technicians also find damaged rubber flappers after years of pressure and vibration. FEMA estimates that one inch of floodwater can cause about $25,000 in damage in a 2,500-square-foot home. A small valve defect can become an expensive basement event. That detail deserves more attention.

Tips: Unplug the pump before inspection. Check the arrow on the valve body. It must point toward the discharge line. Pour water into the pit and watch for rapid backflow. Clean the valve during annual maintenance. Replace it when the hinge sticks, the seal looks cracked, or the pipe vibrates. The U.S. Department of Energy recommends regular equipment maintenance because neglected components often lose efficiency before failure becomes obvious. A valve can look clean and still leak. Assume nothing.

Warning Signs of a Damaged Check Valve

Why Does a Sump Pump Check Valve Fail?

Warning Signs of a Damaged Check Valve

A damaged check valve often reveals itself through sound and water movement. A sharp thump after each pump cycle may indicate reverse flow. Water may rush back into the pit when the motor stops. The discharge pipe can also shake, loosen, or develop small leaks. Listen closely. In basement inspections, I have found that repeated cycling is easy to dismiss as a pump problem. Sometimes, the valve is the real cause. Sediment, a worn hinge, incorrect installation, or freezing temperatures can prevent the valve from sealing properly.

Watch the water level after a normal cycle. The pit should fall and remain low. If it quickly rises again, backflow may be occurring. A humming motor without strong discharge is another warning sign. It can mean the pump is working harder than expected. The Insurance Information Institute reports that water damage and freezing accounted for about 29% of homeowners insurance claims during 2017–2021. FEMA also estimates that one inch of indoor water can cause roughly $25,000 in damage. These figures are not valve-specific, but they show why a small failure deserves attention. Turn off power before inspection, and check for debris, loose fittings, or a valve installed backward. My own judgment can be imperfect; replacing a valve without confirming the flow direction may repeat the problem. Testing should follow the installation instructions and local plumbing requirements.

Why Does a Sump Pump Check Valve Fail? - Warning Signs of a Damaged Check Valve

Warning Sign Likely Check Valve Problem What Is Happening Recommended Check Priority Typical Correction
The pump runs repeatedly after shutting off Valve is stuck open, installed backward, or not sealing properly. Water in the discharge pipe flows back into the sump pit and raises the water level again. Watch whether water returns to the pit immediately after the pump stops. High Clean or replace the check valve and confirm the flow arrow points away from the pump.
Unusual banging or water-hammer noise The valve closes too abruptly, is loose, or has a damaged internal flap. A sudden change in water flow causes vibration or a knocking sound in the discharge piping. Listen when the pump stops and inspect pipe supports, couplings, and valve connections. Medium–High Secure the piping and replace a worn or incorrectly sized valve.
Water level rises quickly after the pump stops The check valve is allowing significant backflow. The vertical column of water in the discharge line drains back into the pit. Observe the pit during a test cycle and check for reverse flow at the discharge outlet. High Replace the valve if its seal is worn, cracked, obstructed, or contaminated with debris.
The pump cycles more often than usual A partially leaking valve is reducing the effectiveness of each pumping cycle. The pump removes water, but some of it returns, causing the float switch to activate again. Compare current cycling behavior with normal operation and inspect for reverse flow. High Service the valve and verify that the pump is not operating against a blocked or restricted discharge line.
Little or no water leaves the discharge pipe The valve may be installed backward, jammed closed, or blocked by sediment. Restricted flow prevents the pump from moving water efficiently. Turn off power before inspection and check the valve direction, opening mechanism, and pipe for blockage. Urgent Correct the installation, remove obstructions, or replace the valve if it cannot open freely.
Visible leaking around the valve or fittings The valve body, seal, threaded connection, or coupling may be cracked or loose. Water escapes from the discharge assembly instead of remaining in the intended flow path. Inspect the valve and nearby joints for moisture, cracks, corrosion, or damaged seals. High Tighten suitable connections without over-tightening, or replace damaged components.
Water backs up near the sump discharge The valve is leaking, or the discharge line has inadequate drainage or a blockage. Discharged water cannot move away properly and may return toward the pit. Check the outlet for ice, soil, debris, or a blocked termination, then test the valve for backflow. Urgent Clear the discharge path and repair or replace the check valve as needed.
Motor overheats or the pump sounds strained A stuck valve or restricted discharge is increasing resistance against the pump. The pump works harder while moving less water, which can shorten motor life. Stop the pump if it becomes unusually hot and inspect the valve and discharge line after disconnecting power. Urgent Remove the restriction and replace a defective valve before returning the pump to normal service.
Flooding occurs even though the pump turns on A failed valve may be contributing to backflow, although pump failure, a blocked line, or excessive inflow may also be involved. The system is not removing water faster than it enters the pit. Check pump discharge, valve direction, power supply, float movement, and the entire outlet line. Critical Address the source immediately and use backup pumping or professional assistance if water continues rising.

Safety note: Disconnect electrical power before removing, cleaning, or replacing a sump pump check valve. A check valve problem can resemble a clogged discharge line or a failing pump, so inspect the complete discharge system before selecting a replacement.

How to Diagnose a Failed Sump Pump Check Valve

Why Does a Sump Pump Check Valve Fail?

How to Diagnose a Failed Sump Pump Check Valve

A failed check valve often reveals itself through repeated pump cycling. After shutdown, listen for water rushing back into the pit. Watch whether the water level rises quickly. A healthy valve should hold the discharge water above the pump. The sound can be subtle.

Unplug the pump before inspecting anything. Check the valve body for cracks, loose clamps, or a reversed flow arrow. Remove visible dirt from the valve opening, but do not force the flapper. Small gravel can prevent a complete seal. If the discharge pipe feels loose, the valve may be moving during each cycle. That movement can damage its connections.

Test the system with clean water and observe one complete cycle. The pump should remove water, stop, and remain off without immediate refilling. A short return flow suggests a leaking valve. However, a rising pit can also indicate a blocked discharge line or excessive groundwater. Noise alone is not proof. I once treated a rattling valve as the main problem, but a loose pipe support caused the noise. That mistake matters because replacing a sound valve wastes time and may hide the real fault. If the valve leaks after cleaning, replace it with the correct size and flow direction. Keep electrical connections dry, and request qualified help when wiring or submerged components are involved.

Ways to Replace and Prevent Check Valve Problems

A sump pump check valve can fail when sediment, rust, or mineral scale blocks its flap. Repeated water hammer may also weaken the hinge or loosen the valve connection. When the valve sticks open, discharged water flows back into the pit. The pump then cycles more often and may overheat.

During replacement, switch off electrical power and remove standing water around the work area. Never work on a powered pump. Loosen the pipe connections carefully, because brittle fittings can crack without warning. Match the replacement valve to the pipe diameter, flow direction, and pump discharge line. Install it with the arrow pointing away from the pump. Secure each connection, but avoid excessive tightening. A damaged gasket can leak even when the fitting feels firm. Run a short test cycle before closing the pit cover.

Prevention requires simple, repeated checks. Remove dirt from the basin and inspect the valve during routine pump maintenance. Pour water into the pit and listen for smooth operation. A sharp bang after shutdown may indicate water hammer or a loose valve. Check for dripping joints, unusual vibration, and slow drainage. Keep the discharge line supported, especially near the valve. One mistake I have made was testing the pump without checking the pipe movement. The valve worked, but the shaking connection later leaked. That small oversight mattered. Record inspection dates and replace worn clamps or seals early. In freezing conditions, protect exposed discharge piping from ice blockage.

Why Does a Sump Pump Check Valve Fail?

Debris buildup, incorrect installation, normal wear, freezing, and excessive water hammer are common reasons a sump pump check valve stops working properly. Replacing the valve with the correct size, installing it in the direction of flow, securing the discharge pipe, and cleaning the system regularly can help prevent repeat failures.